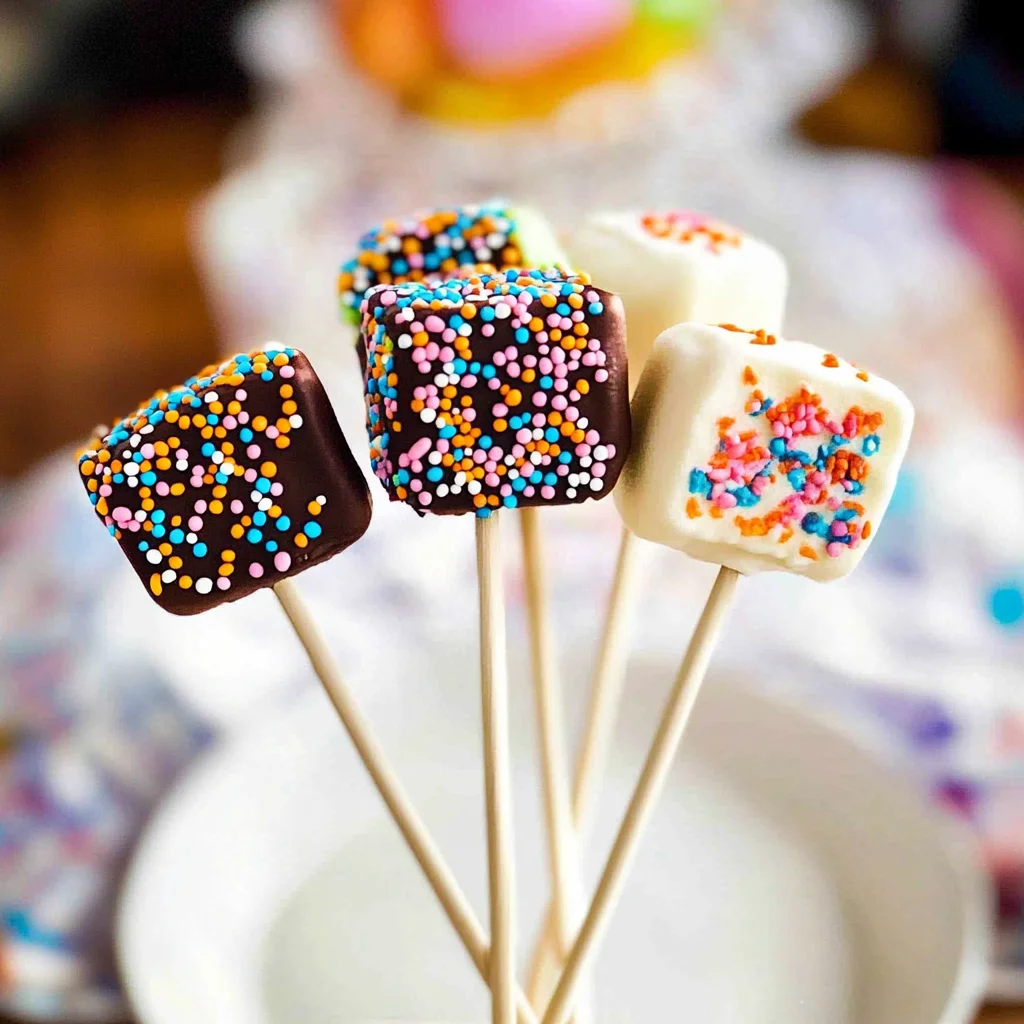
Imagine biting into a fluffy, pastel Halloween marshmallow pop, where the sweet aroma of melted chocolate mingles with hints of vanilla and just a whisper of seasonal spices wafts through the air. With each delightful crunch of candy coating giving way to soft, chewy marshmallow, these treats become an instant favorite that can turn any spooky gathering into a joyful celebration, making everyone feel like a kid again.
As I recall the laughter echoing through our home during last year’s Halloween party, these vibrant marshmallow pops were the star of the show, capturing hearts (and taste buds) alike. Perfectly whimsical for trick-or-treaters or as a charming centerpiece at your next festivity, they promise a flavor experience that’s as memorable as the ghost stories shared around flickering candles.
Why Is Pastel Halloween Marshmallow Pops So Irresistibly Good?
Delightfully colorful and festive, these marshmallow pops bring a cheerful twist to Halloween treats. Effortless to make, with just 30 minutes of prep, they’re perfect for busy celebrations. Versatile flavors come from white chocolate and pastel candy melts, ensuring everyone finds their favorite. Eye-catching sprinkles add a fun crunch that kids and adults adore!
Pastel Halloween Marshmallow Pops Ingredients
- For the Marshmallows
16 pieces large marshmallows – These fluffy treats serve as the delightful base for your festive pops.
- For the Chocolate Coating
1 cup white chocolate chips (melted) – This creamy coating adds sweetness and helps the pastel candy melts stick beautifully.
- For the Colorful Coating
1 cup pastel candy melts (various colors) – These vibrant melts will transform your pops into a whimsical Halloween treat.
- For the Fun Decoration
1/2 cup sprinkles (pastel colors) – Sprinkle generously to create a joyful, eye-catching finish on your Pastel Halloween Marshmallow Pops.
- For Assembly
4 pieces lollipop sticks – These sturdy sticks make it easy to enjoy each marshmallow pop without any mess.
How to Make Pastel Halloween Marshmallow Pops
1. Insert a lollipop stick into each marshmallow. This will be the handle for your delightful pops, so make sure to push it in firmly but gently, about halfway through the marshmallow.
2. Melt the white chocolate chips in a microwave-safe bowl, stirring every 30 seconds until smooth. Watch closely for that creamy texture—it should be completely melted without any lumps.
3. Dip each marshmallow into the melted white chocolate, allowing excess to drip off. This creates a sweet base for your pops. Ensure they’re well-coated for that lovely glossy finish!
4. Place the dipped marshmallows on a baking sheet lined with parchment paper. This prevents sticking and makes cleanup a breeze! Let them set for a few minutes at room temperature.
For the Decoration:
5. Melt the pastel candy melts according to package instructions. Choose vibrant colors—think soft pinks, blues, and yellows—to give your Pastel Halloween Marshmallow Pops that festive flair!
6. Dip the white chocolate-covered marshmallows into the melted pastel candy melts. This second layer adds a fun pop of color and sweetness; make sure they are fully coated!
7. Sprinkle immediately with pastel sprinkles before the candy melts harden. This is where your creativity shines! Use as many sprinkles as you like for that extra festive touch.
8. Allow the marshmallow pops to set completely before serving. Patience pays off here; let them rest until firm to achieve that perfect bite.
Optional: For an added twist, drizzle some melted chocolate over the top before serving!
Exact quantities are listed in the recipe card below.
Expert Tips

- Stick Placement: Ensure the lollipop stick is inserted firmly into the marshmallow to prevent it from falling off during dipping.
- Chocolate Consistency: Melt the white chocolate chips until smooth but not too hot; overly heated chocolate can clump and ruin your Pastel Halloween Marshmallow Pops.
- Sprinkle Timing: Work quickly after dipping in pastel candy melts; adding sprinkles while the coating is still wet ensures they adhere perfectly.
- Cooling Surface: Use parchment paper for setting; it prevents sticking and allows easy removal once your marshmallow pops are set.
- Color Combinations: Feel free to mix different pastel candy melt colors; creativity with color combinations adds a festive touch to your treats.
How to Store and Freeze Pastel Halloween Marshmallow Pops
- Room Temperature: Enjoy your Pastel Halloween Marshmallow Pops for up to 3 days when stored in a cool, dry place in an airtight container.
- Fridge: If you’d like them to last a bit longer, place the pops in the fridge for up to a week, but keep them sealed tightly to prevent moisture.
- Freezer: For longer storage, freeze the pops for up to 2 months. Wrap each one individually in plastic wrap and then store them in a freezer-safe bag.
- Reheating: These marshmallow pops are best enjoyed cold or at room temperature. Avoid reheating, as it may alter their delightful texture!
Pastel Halloween Marshmallow Pops Your Way
Feel free to unleash your creativity and customize these delightful treats to match your Halloween vibe!
- Chocolate-Covered: Dip the marshmallows in dark chocolate instead of white for a rich, decadent twist. The combination of sweet and slightly bitter creates a beautiful contrast that will have everyone reaching for more.
- Nutty Delight: Add crushed nuts like almonds or hazelnuts to the melted chocolate before dipping for a crunchy texture. This adds an exciting crunch that balances the softness of the marshmallow perfectly, making each bite a delightful surprise.
- Spiced Up: Mix in a touch of cinnamon or pumpkin spice to the melted white chocolate for a seasonal flavor boost. This warming spice elevates your pops and brings in that cozy autumn aroma, making them even more inviting.
- Fruit Flavored: Use flavored candy melts such as strawberry or orange to give your pops a fruity twist. This variation not only adds vibrant colors but also infuses them with deliciously refreshing flavors that brighten up your Halloween festivities.
- Vegan Option: Swap large marshmallows for vegan ones and use dairy-free chocolate chips. These swaps ensure everyone can enjoy this festive treat without sacrificing taste or fun!
- Caramel Drizzle: After dipping in chocolate, add a drizzle of caramel sauce on top for an extra layer of sweetness. The gooey caramel complements the pops beautifully, adding an indulgent touch that’s hard to resist.
- Mini Pops: Use mini marshmallows and shorter lollipop sticks for bite-sized treats perfect for little hands. These adorable mini versions make great party favors or snacks that kids will love, ensuring no one feels left out at the celebration!
Make Ahead Options
When it comes to festive treats like Pastel Halloween Marshmallow Pops, prepping ahead can save you valuable time and stress. You can easily prepare the components of this delightful recipe in advance, making your celebration smoother. Start by inserting a lollipop stick into each of the 16 large marshmallows, and then melt 1 cup of white chocolate chips in a microwave-safe bowl, stirring every 30 seconds until it’s perfectly smooth. Dip each marshmallow into the melted white chocolate, allowing any excess to drip off before placing them on a parchment-lined baking sheet. This step can be done up to 24 hours in advance! Next, melt the pastel candy melts according to package instructions and dip the marshmallows when you’re ready to serve. Remember to sprinkle with pastel sprinkles before the candy sets for maximum color and fun! For best quality, store your dipped marshmallows in an airtight container at room temperature for up to 3 days before finishing with the pastel candy melts. Enjoy these sweet treats without any last-minute rush!
Pastel Halloween Marshmallow Pops Recipe FAQs
What type of marshmallows work best for this recipe?
For the best results, use large marshmallows. They provide a perfect canvas for the delicious white chocolate and pastel candy melts, and their size makes them easy to handle when inserting lollipop sticks.
How should I store leftover marshmallow pops?
Store your pastel Halloween marshmallow pops in an airtight container at room temperature. They will stay fresh for up to 5 days, but if you live in a warmer climate, consider refrigerating them to prevent melting.
Can I freeze marshmallow pops for later use?
Yes, you can freeze your pastel Halloween marshmallow pops! Wrap each pop individually in plastic wrap and place them in a freezer-safe bag. They can be stored in the freezer for up to 2 months. Just remember to let them thaw at room temperature before serving.
What should I do if my chocolate or candy melts are too thick?
If you find that your melted white chocolate or pastel candy melts are too thick to dip easily, simply add a teaspoon of vegetable oil or coconut oil while stirring to achieve a smoother consistency. This will make dipping easier and help create an even coating on your marshmallows.
How many servings does this recipe yield?
This delightful recipe yields about 4 servings, with each serving containing approximately 150 calories. Feel free to double or triple the recipe if you’re hosting a larger gathering—these festive treats are sure to be a hit!
Are there any dietary considerations I should keep in mind?
For those with dietary restrictions, look for gluten-free marshmallows and ensure your white chocolate chips and candy melts are suitable for your needs. There are also vegan alternatives available if you’re looking to customize this treat further!
Pastel Halloween Marshmallow Pops
Ingredients
Method
- Insert a lollipop stick into each marshmallow.
- Melt the white chocolate chips in a microwave-safe bowl, stirring every 30 seconds until smooth.
- Dip each marshmallow into the melted white chocolate, allowing excess to drip off.
- Place the dipped marshmallows on a baking sheet lined with parchment paper.
- Melt the pastel candy melts according to package instructions.
- Dip the white chocolate-covered marshmallows into the melted pastel candy melts.
- Immediately sprinkle with pastel sprinkles before the candy melts harden.
- Allow the marshmallow pops to set completely before serving.